Wednesday, February 1, 2017

Bombay Toast (Like French Toast)


I didn't have big plans when I started this year and as usual didn't make any New year resolution too , other than to post at least one recipe every month ,
so I tried many interesting recipes to start but most of it didn't turn up good to post it here :(


So posting another simple breakfast recipe today :(


I like the word "simple"  than "Complicated"


Ingredients 

Bread Slices - 5 No's (white ,brown or anyother)
Milk - 2 cups
Eggs (large) - 1 No
Sugar - 1/2 cup (Or more if your like)
Vanilla essence -  few drops (or a pinch of Cardamom powder or Nutmeg) what ever you prefer.
Butter  to toast - 2 tbsp (or more if serving these for kids)

For decoration - Added some chocolate chips, syrup & Confectioners sugar
(That's how I try to tempt my fuzzy eater )

Method 

* Beat well Eggs & sugar , slowly add milk and essence (or powder), keep aside when well combined.

* Heat a pan (preferably non stick pan , or coat the surface with some oil, when pan is hot enough, reduce the temperature to medium.

* Dip both the sides of bread slices in the beaten Egg- milk mixture,

* Toast each sides of the bread with some butter in the heated pan for not more than 4 minutes, until the sides starts to turn brown.


For those who haven't had a great start, its never late , keeping positive spirit  is the best thing we can do to ourselves.


Cheers
TN

Wednesday, October 5, 2016

Egg Burji


I know its kinda kiddish to blog recipe of Egg Burji( Scrambled Eggs)  but this is for the novice - that's what I'll say but the truth is, am trying to help myself get back to blogging after a break ....

This year was hectic for me so far, my new baby keeps me busy all the time , we moved to our first home here and then there's this never ending renovation happening, making my surrounding messy and dusty :( hope it gets over soon. 
Sad demise of our Amamma (Hubby's Granny) was the worst part,I don't know how many times I have described about her in this blog, as she was an absolute Gem, wise and graceful , am not sure if I'll be able to achieve fineness of character she had anytime in my life, even if I live 92 years (to live 92 years ? question mark very necessary here ) that was her age... but she lived her life feeding others with love, she's my role model. 
We traveled to India for her funeral , myself and kids were lucky to stay there for 2 months and then we reached back here few weeks ago.
My experience travelling 32 hours alone with 2  kids is worth sharing...hhmm... may be later.


Many obstacles for me to continue blogging :(
another thing , pictures I post wouldn't be so good, ( I don't think it was so good before too) but it may go worse :( as I lost my camera charger...
ssshhhhhh its a secret, will remain a secret till my hubby reads this (it never happens) or till I let my sponsor know that I lost it, while shifting, or renovation or baby and bla bla .....anyways am sure my readers would adjust as you guys have been so good to me. so all these pics are from my phone.


Here's the recipe of Anda Burji AKA Indian style scrambled eggs.
you know what,
Cilantro / Coriander leaves  and Cumin powder makes it Indian :D

You'll need

Eggs - 4 No's
Onions - 1 medium sized finely chopped
Tomatoes - 2 no's
Cilantro - half bunch
Garlic and ginger - finely chopped - 1/2 tsp
Green chili's - 2 to 4 No's (adjust as per your preference)
Oil - 2 tbsp
Cumin powder - 1/4 tsp
salt to taste

and 15 minutes is more than enough to make these

Method 

Beat Egg's with some salt , keep aside.

Heat oil , add ginger , garlic , onion and green chili's and saute till onion looks golden brown , add then tomatoes and continue sauteing till oil starts to separate ,   add finely chopped cilantro , salt and cumin powder. Stir and add beaten eggs , cook in medium to high heat , stirring constantly for another 4 to 6 minutes. Switch off the heat.


Serve with Roti , Rice or Bread.


Cheers
TN

Wednesday, February 24, 2016

Tiramisu Cake


A "Bundle of Joy" my gift from Santa is here by my side now, named her Tania Maria.
of-course not easy as I always take time to get adapted to the new changes in life, and time is flying in jet speed for me,  no matter how much ever I plan and prepare myself, an initial fighting phase is always there and this is one among the many things I am yet to learn to manage.
Anyways am enjoying it though I miss cooking, which is therapeutics for me, a stress relieving exercise too :(


Have a very easy Tiramisu Cake recipe, coincidentally a sweet dish as the first post this New year, after the break :D
 Made this for Soccer man's Birthday.
He being a fan of Tiramisu said he loved it.


I am sure You'll not be disappointed if you try making this,  if you are a fan of Coffee.
Recipe adapted from Allrecipes.com -  I used cake mix  which makes it super easy,
 may also make this with any Sponge Cake.


Ingredients 

For Cake 

White or Yellow Cake Mix - 1 package
Instant Coffee Powder - 1 tsp
Hot Coffee - 1/4 cup
Coffee Liqueur (Rum or Vodka) -2 tbsp (Optional)
Sugar - 2 tbsp

For Filling 

Mascarpone Cheese - 1/2 container (4 oz)
Cream Cheese - 1/2 package (4 oz)
Confectioners Sugar - 1/2 cup
Coffee Liqueur (I used Vodka) - 2 tbsp

Frosting & Decorating 


Whipping Cream - 2 cups
Confectioners Sugar - 1/2 cup
Instant Coffee - 1 tsp
Semi Sweet Chocolate - 1 square
Cocoa Powder - for dusting


Method 

Prepare Cake 

* Preheat Oven to 350 Degree F, Grease 3 small round Pans, keep aside.
* Prepare Cake batter as per package instructions, divide the batter in to 3 portions, add 1 tsp instant Coffee powder to one portion. Pour the prepared batter to the pans and bake for 20 to 25 minutes till a tester comes out clean. Let Cool.
* Mix Liqueur to the prepared hot coffee , add in sugar and stir. Keep aside.

For Filling

* Mix Cream cheese & Mascarpone  (keep outside to soften) ,sugar and Liqueur,  stir well till everything combines.

For Frosting 

* Beat the cream until it starts to thicken, add sugar and instant coffee and beat again until stiff. Refrigerate for sometime.

Assemble the Cake 

* Place 1 plain player cake on a serving plate , poke holes in the cake using a thin skewer or tooth pick, pour little of the prepare hot coffee over and spread some of the prepared filling over this cake.

* Top this with the coffee layered cake , poke holes in this cake (as done with the first layer) , pour little hot coffee over and spread the rest of the filling over this second layer.

* Top this again with the third cake (Plain cake) , poke holes in it as done above and pour the rest of the hot coffee.

Frost the Cake

* Spread the sides and top of the cake with frosting, Place Cocoa powder in a sieve and lightly dust the top with it. Garnish with grated semi sweet chocolate.


Notes: 

Do not pour more hot Coffee to the cake as then it may get too soft to frost the same.

Click the link-  Allrecipes.com to see the video presentation of this cake.


Cheers
TN


Wednesday, December 9, 2015

Vegetable Upma Recipe


Am getting carried away seeing the happiness and smiles on familiar around,
 "Joy" which comes with December.....though I have a big task in front of me, probably this month  :/
Anyways its time to forget all worries/anxieties, thanking Almighty for another year in our life that we complete this month and hope to have a wonderful New-year.
We should go in pace with the celebration and enjoy :) no matter what as "December" comes again only after a year :D


"Upma" is a very popular, easy to make South Indian Breakfast,
Recipe here has a creamy twist which will make your Upma extra rich and flavorful,
Do give it a try and you'll never be disappointed :)


Ingredients 

Rava/Semolina - 1 cup
Onion - 1/2 of One medium sized, finely chopped
Green Chili's - 3 No's
Tomato - 1/2 of one medium sized, finely chopped
Carrot - 1 medium sized - finely chopped
Beans - 4-6 no's chopped (Optional)
Ginger - 1/2 inch size Piece - finely chopped
Garlic - 2 No's finely chopped
Ghee/ Vegetable Oil - 3 Tbsp
Mustard Seeds - 1 tsp
Cumin Seeds - 1/4 tsp
Split Urad Dal - 1/2 tsp (Optional)
Split Gram Dal - 1 tsp (Optional)
Cashew nuts or Peanuts -  1 tbsp (Optional)
Cilantro/Coriander leaves - 1tbsp chopped (Optional) -avaoid if you dislike its taste.
Ghee - 1 tsp (Optional)
Salt to taste.


And the secret ingredient -
Cooking cream or Whole fat boiled - Milk - 1 cup 

Method 

* Dry roast  Rava in a heated Kadai/Pan for 5 minutes in medium heat, transfer roasted rava to an other plate.

* Heat Ghee/Oil in the kadai, add mustard seeds and allow to splutter, then add cumin seeds and the grams - Urad dal & Gram dal (if using), saute for a minute and add Ginger, garlic and chilies, followed by onion, carrots and Beans (If using) saute in medium heat for 5-10 minutes till the vegetables looks almost cooked.

* Then add Cashew-nuts/Peanuts (If using) , cilantro (If using) and tomato, cook for another 2- 3 minutes stirring vigorously

* Pour 2 cups of water to this and add salt , then pour 1 cup Heavy cream or  whole fat Milk, allow to boil.

* Add 1 tsp of Ghee (optional) to the boiling water + milk and slowly add in the roasted Rava, keep heat to medium-low and stir it while it gets slowly thickened.

*When the Rava looks soaked with the water and it starts to thicken a bit, switch off the heat and allow to get cooked and thicken with the heat within it for 2-3 minutes.


* Serve this creamy, delicious Upma immediately while its still hot, with ghee and Sugar.


Notes :

I like my Upma to be soggy, so I added 3 cups of liquid for 1 cup of Rava, In Kerala Upma is made dry with less water and its enjoyed with Banana/Plantain and sugar.
If you need it dry add just 1 cup water and 1/2 cup Milk or cream (if adding) , and cook the same in low heat stirring vigorously till the Upma looks dry.

*Do try adding milk as it gives a very creamy texture and flavor to the Upma, but do add boiled milk only if using.


Cheers
TN 

Friday, November 20, 2015

Achappam (Kerala Rosette Cookies)


My pregnancy this time reminded me of many things that I loved to eat while I grew up. Fried Sardine-eggs , Jackfruit & many snacks made with the it & Indian Coffee House special "Masala Dosa"
I am grateful to all my dear friends who brought special food for me all these 8 months, I didn't miss my home much because of you guys  & am so glad that I have you all :)
Since Achappom is my all time favorite snack decided to try making it , I haven't made it before. 
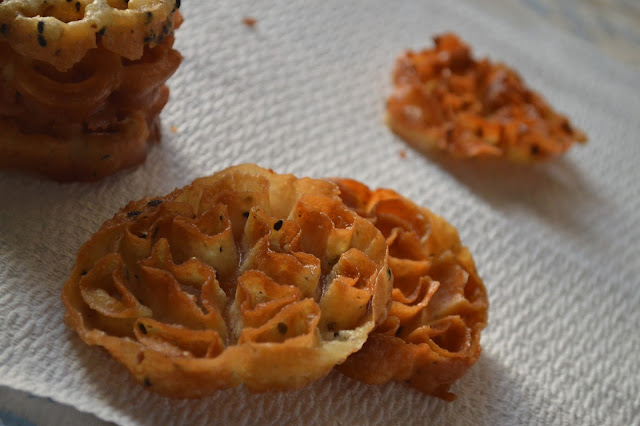
Glad it came out really good for me, though It didn't come out well the first batch was wasted. Correct temperature of Oil and Achu/ mold is the key. 


To make "Achappam" you'll need this special "Achu" specially designed mold, I brought it from Kerala,  but it came out really well, these are available in Amazon, there's variations of these and Non stick varieties too which would be great especially if its your first try 


Yes , again it tested my patience initially while frying'em, but was determined to make it alright until I mastered some tricks while making the same,


Temperature of the oil while frying, getting  used to some "not so good" properties of Iron mold "Achu" , the consistency of batter etc are important, we learn with experience, may be I found it difficult because I haven't seen the way its made.
But I must write it tasted better than any Achappam that I had anytime in my life :)


Please note the lines given in "Bold" in the description given below, if planning to make these. 

Ingredients 

Rice flour - 2 cups
Maida / All purpose flour - 1 tbsp (Optional)
Thick Coconut Milk - 3/4 cup (Approx, adjust as per need)
    (may use full fat Cow's milk too though its not used traditionally)
Egg - 1 small beaten
Sugar - 3/4 cup
Black Sesame seeds - 1 tbsp
Cumin seeds - 1 tsp
A pinch of Salt

Oil for frying

Method 

* Mix all ingredients listed above for the batter, in a bowl , adjust the quantity of coconut milk to make batter thin in consistency, thinner than Dosa batter (or pan cake batter). Keep this for 20 to 30 minutes.

* Heat oil in a deep wok or saucepan, dip and keep the "Achu" Iron mold in the oil while its gets heated (at least for 5 minutes) until the oil and the "Achu" is really hot, bring down the heat to medium high.


* Transfer a small amount of the batter to another steel or aluminium bowl, so that each time you dip the hot "Achu"in to the batter, it doesn't make any changes to the whole batter, also its good to make these in batches especially if making these for the first time. You may make any changes to the next batch if its not coming out well with the first attempt.


* Check if the oil is really heated by frying few drops of batter in to the oil and it should bubble up fast. Once the oil is ready, take out the "Achu"/Iron Mold from the oil, shake off excess oil from the "Achu" and dip it to the prepared batter, immediately drop this "Achu" to the oil.
Do not dip the whole Achu/iron mold into the batter , then the batter wouldn't come out of it while frying. 

* Once the Achu/iron mold is in the oil, wait for few seconds and then shake it lightly so that the Achappam comes out of it and gets fried, turn to the other side after few more seconds. Should be light brown in color on both sides.
If the Achappam doesn't get separated from the mold, use a fork to help separate it slowly,

* Ensure that the Mold/Achu is really hot every time you dip it to the batter or else the batter wouldn't get stick to it, also shake off excess oil from it before dipping the same in to the batter each time, its good to keep the Achu/Mold dipped in the heated oil after each Achappom is made, so that its temperature is maintained.Fry the rest of the Achappam's similarly.


* These Achappam's would be soft just after frying , place the fried Achappam's on to a tissue-paper and allow to cool and get crispy. Once cooled, transfer'em to an air tight container or Ziploc bag, it stays for a few weeks.

 Enjoying Crispy Achappoms
:D

Notes : Please note the lines given in "Bold" in the description above if planning to make "Achappom"

Cheers
TN


Wednesday, November 11, 2015

Home made (Yellow) Jalebi Recipe & Happy Diwali


Since India is celebrating one of her biggest festival "Diwali" today,
I was determined to make some thing sweet, which is compulsorily made in all houses celebrating "Diwali" This being my second Diwali after I started blogging in full pace, I decided to make Yellow Jalebi" making of which is little tricky I must write :/
and am not very satisfied by the way it looks :(
last year I made Boondi Ladoo, which I felt was far easier to make.
To make these all you need is patience, but am sure If I can make it, any body else can do it easily :D
as I believe I am among the list of impatient people,
though am trying to improve :(


Referred many blogs and you-tube links before making these,
found the recipe in vegrecipesofindia.com  very descriptive, click link for her Jalebi recipe.
I made some changes to the recipe above to reduce the fermentation time.


Here's how I made it.

Ingredients 

Maida/All purpose flour - 1 cup
Corn flour - 1 tbsp
Besan /Gram flour - 2 tbsp
Fast acting Yeast - 1/2 tsp (Optional, instead use Soda powder)
Sugar - 1 tsp (use only if using yeast)
Salt - a pinch
Turmeric Powder - 1/4 tsp
Thick curd - 1/2 cup
Water - 1/2 cup + 2 tbsp (Approx, I used 2-3 tbsp more)
Oil - for frying

For Sugar syrup 

Sugar - 2 cups
Water - 2 cups
Lime juice - 1/2 tsp
Cardamom or  saffron threads - few

Method 

Optional -   * Heat 2 tbsp water till warm and add 1 tsp sugar to it, mix well and then add yeast, keep for 5 to 7 minutes in warm place to activate yeast. This step is for those who intend to use Yeast, may add Soda powder instead.

   * Mix together Maida + Besan + Corn Flour + turmeric powder + curd + 1/2 cup water+activated Yeast mixture (if using)  Mix well using a spoon for 4-6 minutes until the batter looks smooth (not too thick not too thin in consistency) If using Soda Powder instead of yeast, add it just before frying.


*  keep these for fermentation for at least 6 hour's, (taste best if kept for longer time)

Batter after its kept for 6 hour's to ferment. 


* To make Sugar syrup, boil water and sugar, to bring it to one string consistency, when it reaches the required thickness add lime juice & crushed cardamom. May add color or Saffron to this syrup, saffron would give a light yellow color naturally, but I didn't have the same so used color, which made my Jalebi look brown :(

* Heat Oil in a frying pan, bring to  high heat initially then turn the heat to medium-high heat, temperature of the oil determines how your jalebi's would look like (color and shape) as its hard to make those shapes if the oil is really hot, hence regulate the temperature accordingly.

* Beat the batter once again,add 1 to 3 tbsp water to the batter if it looks thick after fermentation (Batter shouldn't be too thin) transfer'em to a piping bag/ or use any squeezable ketchup bottle's,try piping'em to a paper before frying. Start frying the same 2 to 3 minutes on both sides, I like my jalebi's to be little crispy so I fried it for little more time.

* Making perfect round shapes for these jalebi's was not easy, but after frying few shapeless jalebi's,
I learned the trick, anyways shapeless jalebi's also taste equally good so its fine ;)

* Dip these fried Jalebi's in sugar syrup for 1 to 2 minutes and place them on to a flat plate. If planning to keep for more days, store in air tight containers and refrigerate.


Enjoy !


Wishing you all a very Happy and Blessed Diwali :)

Cheers
TN


Wednesday, October 21, 2015

Vegetable Pulao Recipe ( Veg Pilaf)


Orange tint and scent of pumpkin pie "Fall" is here & am loving this time of the year like never before, enjoying the rain which I missed this year.
Hope all in US is getting ready with kids for Halloween. I have 4 large pumpkins here :(
that's how Dad pamper their kids :/
now its my turn & NA already started nagging to start carving :(
Anyways that's a fun thing to do with kids.....Love it when I see her eyes sparkle with excitement.

Here's a picture of one that I carved last year.

NA excused that asymmetrical face, was convinced with a happy looking Witch :D


Busy days with my in-laws who are here for a month, roaming in and around Salt lake and exploring new places here is of-course fun,though I miss my blog :(
A good DIL is not supposed to serve experimented dishes's to her in-laws was my Mom's advice, so today I made something which I am confident in making, a very popular Indian rice dish, more popular in the Northern states of India.


Everyone would have their own way of making it, I usually pressure cook it to save time. But if you are fast in cutting vegetables, a scrumptious meal is ready under half an hour.

Recipe here doesn't need a pressure cooker though you may cook it in the same if you wish.
Pressure cooked Pulao/Pilaf is my favorite for some reason, though it wouldn't give you that appealing look.

Ingredients 

Basmati Rice (Long Grain Rice) -  2 cups
Ginger and Garlic paste/crushed - 1 tbsp (together)
Onion - 1 medium chopped
Mixed vegetable's - 1 cup chopped  (carrots,beans ,peas ,cauliflower etc)
Tomato - 2 large chopped
Green chili's - 4 to 6 no's (Use as per your preference)
Cilantro chopped - 1/4 cup
Mint Leaves chopped - few springs (Optional)
Juice from 1 lime
Water - 4 cups - double the amount of rice taken (differs with variety of rice used)
Salt to taste
Vegetable Oil / Ghee - 3 tbsp

Whole spices 

Cumin Seeds - 1 tsp
Cardamom - 2 no's
Bay leaves - 1
Cloves - 3 no's
Cinnamon stick - 1/2 inch size piece

To Decorate (Optional)

1 medium size Onion, sliced and fried to golden brown color
1 Tbsp each Cashew nuts and Raisins (I didn't use)


Method 

* Soak Rice in water first before starting to cook. Heat oil in a pot / Pressure cooker or rice cooker.

* Add to the heated oil lightly crushed whole spices (given above) add then Ginger-Garlic paste and saute for a minute, followed by chopped onion.

* When onion looks golden brown, add the other vegetable's and half portion of the chopped tomatoes.

* Saute the vegetables for 2- 4 minutes and then add the drained rice, continue stirring for another 5 minutes.

* Add in the leaves (Cilantro and Mint-if using) and stir to combine. Add salt , lime juice, the rest of the chopped tomatoes & water.

* Cover and cook the same in low heat (if using an open pot) till  the water is absorbed and rice is cooked. Do stir rice in between to check if the water is enough, sprinkle water in between if necessary.

* Once the rice looks cooked, let this sit for 5-7 minutes (Keep this open) , then use a fork to fluff up the rice.Decorate with fried Onions, Cashew-nuts and Raisins.


*  Serve Pulao/Pilaf  hot with Raita, Mint Chutney, Pickle and/or any Curry.


Notes 

  * If using a pressure cooker, cook till 1 whistle heard, immediately transfer the cooker to a cool place, once the pressure is released open the lid and use a fork to fluff up the rice, transfer rice to a flat tray/dish and keep this open for 5 to 7 minutes before serving.

Cheers
TN