Friday, November 21, 2014

Garden Rotini with Indian Spices / Kothu Pasta


I remember my Achachen/ Dad used to calculate huge mathematical calculations in his mind first before confirming it with the calculator, though he knew that calculators makes things easy and fast, and then when the Computer came into use, it was so hard for him to accept that drastic change,
we never tried to explain to him the changes that would bring to his business by just using Computer or may be he didn't want that change to happen.
A change is so very difficult to execute, though we know it always mostly does good.
Most of us adapt to the usual way of approach no matter what, because that would help us attain a comfort level, but we being in this fast growing competitive World,are always forced to change for the better.

Saw an interesting Quote about "Change" so thought to post it here.


Everything is going to change, even if we don't want it to be, so lets change when its needed.
There was this Executive Order by the President of the United States regarding Immigration Reforms and the new plans associated yesterday. 
As millions of illegal residents who came to the US with hopes and aspirations,celebrate their freedom in this beautiful Country, we - the H4 visa holders who couldn't work here till now also celebrate and welcome the changes that's going to happen.
Hopefully waiting for our Employment Authorization Document provision and then we are ready to work :) 

Happy Happy.


Well all these have nothing to do with this particular Pasta dish other than the Indian flavor change.


I had these Garden Rotini Pasta's lying in my pantry for sometime now so made this with it , may use any other pasta's for making this dish.
I am not sure if a Mac & Cheese fan can accept this change still if you prefer Indian spices and flavors , do give it a try. 


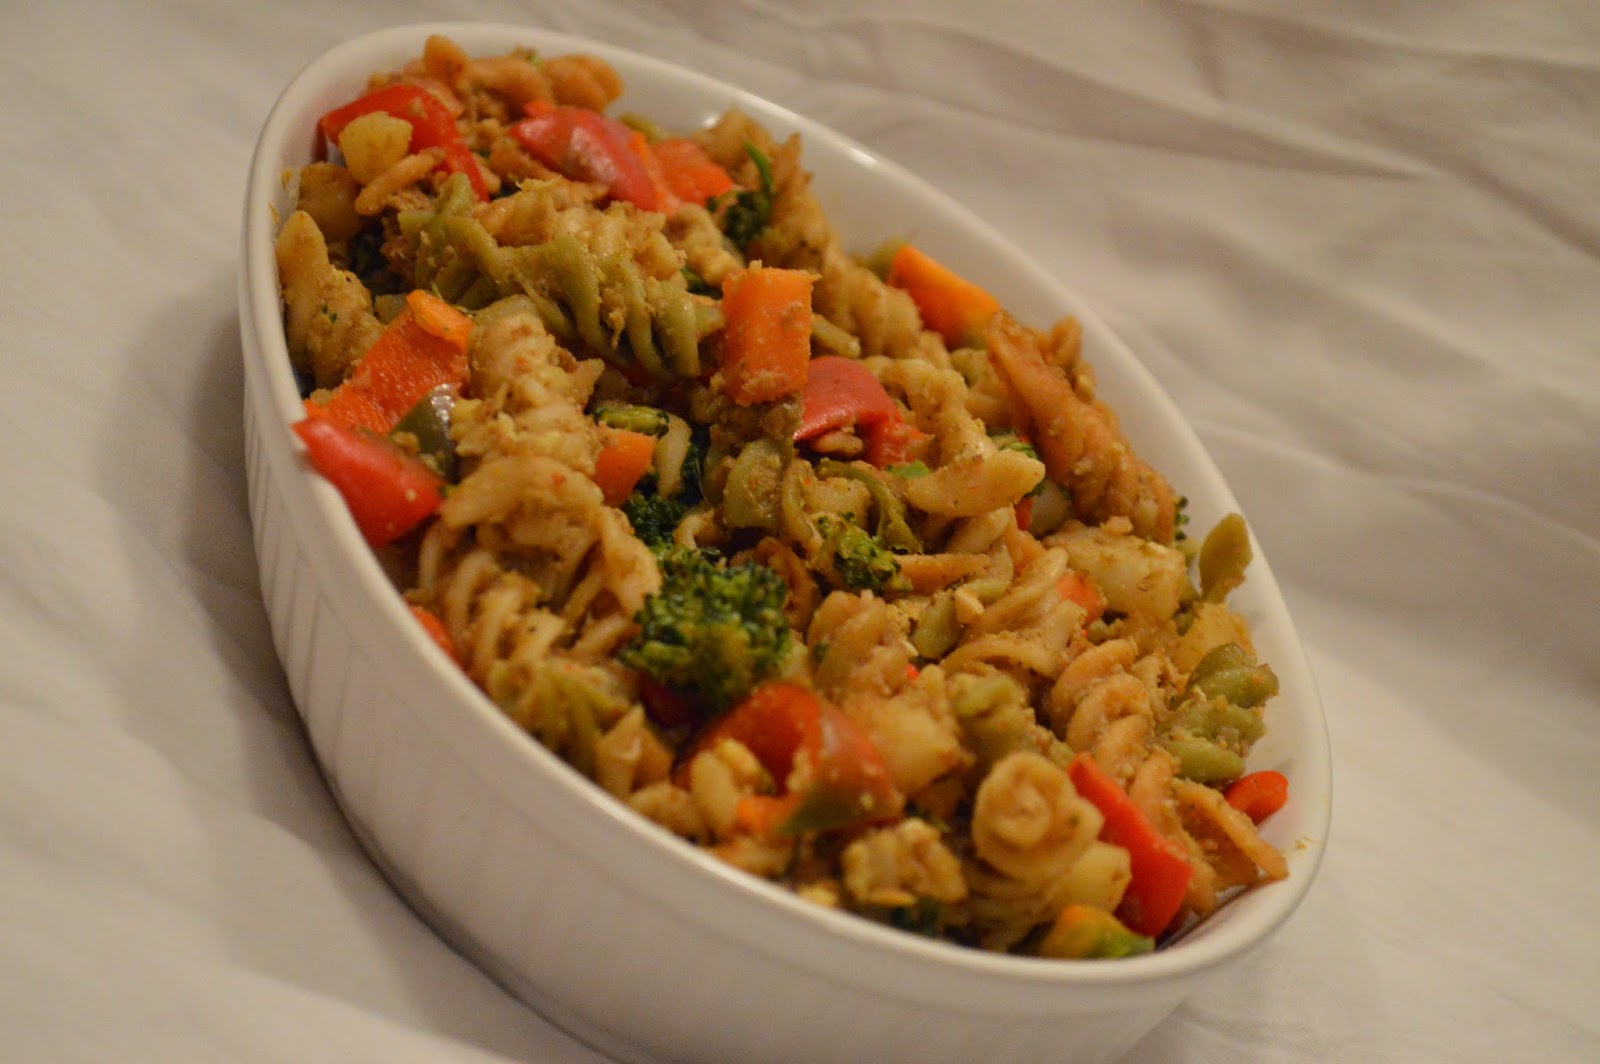
Recipe is similar to a popular South Indian Dish called " Kothu - Porotta " only difference is the use of Pasta instead of shredded Porotta (Indian Bread) Pieces.
Its good if you use stalk while cooking like any left over chicken or beef stalk , this makes its extra flavorful.
If vegetarian may use any seasoning available like the Maggi Seasoning used for Noodle's.


Ingredients 

Any Pasta's - 1 cup or more
Onion - 1 medium chopped in to cubes
Ginger and Garlic - 1 tsp each finely chopped
Broccoli Florets - few (Optional)
Carrot & Potatoes - 1 medium sized cubed (use any vegetable's you like)
Bell Pepper's - 2 (I used red and Green) cubed
Tomatoes / cherry tomatoes - few cubed or sliced
Vegetable Oil - 2 Tb Sp

Indian Spices

Coriander Powder - 2 Tsp
Red chili Powder or flakes / or Paprika  - 1 Tsp (Adjust as per your preference )
Cumin Powder - 1/2 tsp
Garam Masala or else use Chicken Masala Powder (store bought) - 2 Tsp
Vegetable Stalk or any meat-stalk - 3/4 cup (Approx)
Eggs - 2 no's beaten (Optional)
Cilantro / Green onions etc to garnish - (I didn't use  )

Method 

* Cook pasta (till almost done )as per the instructions given its cover, strain and keep aside.


* Heat oil in a pan, add ginger,garlic , onion ,cubed potatoes,carrots & Broccoli florets (add vegetable's which need more cooking time first) cook in medium to low heat till the potatoes (if using) are nicely cooked.
May sprinkle water in between to avoid sticking to the bottom of the pan.


* Add  then the almost cooked pasta's to the above mixture , stir and add the spices - Coriander powder , Cumin Powder , Chili Powder or flakes , Garam Masala or chicken Masala powder and salt. Stir to combine and then add the stalk. (I used the beef stalk which I cooked before,any left over non-vegetarian  thin- curry or gravy would be tasty too)


* Cook till the stalk gets dried, Pasta and vegetable's then absorbs all the flavors from the stalk, stir occasionally

* Using a spoon, move all the contents of the pan to one side to make space to cook the beaten egg,
may drizzle few drops of oil if wanted, pour beaten egg, and allow to cook a bit before stirring.


* Stir to combine everything well when the egg turns its color, Keep heat to medium, add all the other vegetables which needs less cooking (Bell Peppers, green onion,tomatoes etc)


* A final stir and its ready, Transfer to a serving dish , garish with Cilantro or Green onions (optional) and serve hot as a snack or as an appetizer.


Notes :

           This is one pasta dish I liked the most other than Mac&Cheese, may be because I added all spices which I prefer the most. Please use those spices you like, may add or omit any ingredients from the list according to your family choices.
           Add any other herbs like Basil , Oregano etc to give it a different taste.May add some cooked shredded chicken pieces or else add any cheese or Paneer to make it all vegetarian.

Congrats to all dependent H4 visa Holders in USA , we see a Ray Of Hope :)


Cheers
TN

Wednesday, November 19, 2014

Ragi Dosa Recipe / Fermented Ragi Dosa


In my memory first time I tried Ragi was in Bangalore when I started working,
though my Mom says she used to feed Ragi Porridge while I was a baby.
I do remember my younger brother with "Ragi Porridge" all over his face and everywhere around when fed with the same while he was a baby.

In Bangalore we used to share our food during lunch time in office and once my good friend and colleague who's from Karnataka promised us to bring lunch for the whole team, Food is going to be authentic she said and the particular dish "Ragi Mudde" other wise called Ragi Ball , she'll be bringing is a Kannada delicacy. " Ragi " being the largely grown crop in Karnataka.
she said it can be had with any Non - Veg curry like chicken or Mutton , but she'll bring Sambar with it as that's how vegetarians prefer it.
Excitement to taste an authentic dish and its interesting looks attracted me so much that I didn't wait for anybody's permission to dig in to it. Took my first " Bite "

Wait a minute did I say " Bite " OH NO.....

 It got pasted everywhere inside my mouth :(

not being able to open my mouth I didn't know how to react,
noticing my facial expressions like how a " Kathakali " artist does , she understood what I did and said its not supposed to be chewed , its just to be swallowed along with the curry.

OH BOY....
 Y didn't I wait for her instructions.

now you know why I say I am Impatient.


"Ragi Mudde" is a  store house of various nutrients,
no wonder the Former Prime Minister of India "Deve Gowda" urged for having the same prepared and shipped from Karnataka to the Capital,
but only thing is that you shouldn't chew it :)


Health Benefits of Ragi are wide, other than reducing Cholestrol and Blood Pressure
some of its nutritional benefits include reducing Anxiety & Stress as Ragi being a rich source of Antioxidants mainly Tryptophan & some Aminoacids - fights damage causing free radicals in the body hence reducing oxidative stress.
Ragi is an excellent plant source of Iron hence helps to reduce Anaemia due to low hemoglobin levels.
Also its highly recommended for Lactating mothers.


Only issue I have with Ragi was how to make it appealing as I didn't like its taste :(
though I very much want to have it because of its health benefits , tried mixing Ragi flour with Atta to make Chapathi , which is not a bad Idea then tried this recipe which is almost similar to the recipe they have in the Ragi Flour cover which they sell in the Indian store.


For People like me and many other who doesn't like the taste of Ragi , do try this recipe as its good for our health, lets make it a point to cook highly nutritional food stuffs at least once in a week, like Green leafs , Soya , organic vegetable salads , freshly squeezed organic fruit juices and high fibrous grains/flours like Ragi ,Oats ,Quinoa etc.

Here's is how I made Ragi Dosa , it was good , but should enjoy it while its hot.

Ingredients 

Ragi Flour - 3/4 cup (May use Whole Ragi instead)
Rice Flour (Fine) - 1/2 cup  (May use Idli Rice instead)
Split Urad Dal / Husked Black Gram - 3/4 cup
Cooked Rice (White or Brown) - a hand full (Little less than Half cup)
Fenugreek Seeds / Methi Seeds - 1/2 tsp
Sugar - 1 Tbsp
Salt to taste
Water - 1/4 to 1/2 cup(Approx , adjust as you need , try grinding with less water as possible , and add water just to make grinding easier)
Oil or Ghee - few drops for each Dosa's.

Method 

* Wash and soak Urad dal & Fenugreek seeds in water for 3 hour's  (split Urad dal doesn't need more than 3 hour's soaking time, if using whole Urad dal,  Idli rice instead of rice flour and whole Ragi - do increase the soaking time)

* Grind the soaked dal & Fenugreek along with Rice flour, Ragi flour and cooked rice , adding little water to it initially(add more water little at a time to make grinding easier) keep in a warm place to ferment for 6 to 8 hour's depending on the climate.

(I kept it overnight to ferment, during winter , its better to place it in your preheated to Warm - Oven to help ferment it better - make sure your oven is not too hot to cook the batter :)
or else boil water in a deep vessel , when it starts to boil ,switch off the heat ,cover with a lid and place this batter - bowl on top of the lid , keep it in a comparatively warm place to ferment)

* The next day add sugar and salt to taste ,  stir , pour a ladle full of batter over a heated Dosa pan , spread with a spoon , drizzle few drops of oil , flip when one side is done and cook the other side for a minute.


* Serve with any Chutney or Sambar.


A very healthy and  nutritious , equally tasty Ragi Dosa - ready to be served.

Ragi is recommended for weight watchers as it helps reduce and maintain your weight, high amount of fiber in Ragi combines with water, to keep your stomach fuller for longer period.

Its health benefits are so many that I am not able to conclude this post
:)

Cheers
TN

Friday, November 14, 2014

Saag - Palak Shorba / Healthy - Mustard Leaves & Spinach Soup


"Winter" has officially started and Yesterday we had the first snow in Salt Lake.
The most fascinating thing about winter is that the trees starts exposing, sheds the very last leaf which clings to its branches, while people start covering up as much possible as they can.
Besides the beauty of a snow covered scenery, I like many others dislike this season,
Gloomy as it looks :(


So I made some Green Shorba / Green Soup - Its a Punjabi style Soup with " Saag " / Mustard Leaves which people in Punjab makes during winter to keep body warm.


To be honest I loved this soup than the Sarson ka Saag curry that I made with Saag/ Mustard Leaves last winter.
Heard much about "Saag Shorba" in Bombay House Restaurant - here in Salt Lake City,
so thought to try shorba with Saag , as this recipe is usually made with Spinach/ and usually called Palak Shorba.
This is definitely a must try recipe if you live in a place where you have "Winter" season.


Ingredients 

Combination of leaves : 1/2 bunch of Mustard Leaves , 1/2 bunch of spinach , few springs of Cilantro & few springs of Mint leaves (May use only spinach or only mustard leaves for this)


Green Chili's or  Thai Pepper's - 4 to 7 no's (Use as per your preference) may use Black pepper / Pepper Powder too.

Ginger and Garlic - 1/2 tsp each crushed (Optional)

Corn Flour or All purpose Flour - 2 Tbsp

Tomatoes - 1 no's (Optional , may use Lemon juice for that sour taste instead)

Cumin seeds - 1/2 tsp & Cumin Powder - 1 tsp

Onion - 1/2 medium finely chopped (Optional)

Hing / Asafoetida - 1/4 tsp (Optional)

Ghee / Butter or Vegetable Oil - 1 Tb Sp

Heavy Cream - 1/4 cup (more or less)

Salt to taste

Method 

* Cook tomatoes in boiling water (Line tomatoes with a sharp knife -this helps to remove its skin when cooked) , remove tomatoes from this water and keep aside to cool.(Remove the skin)


*  To the same boiling water (Used to cook tomato) , blanch all the leaves along with green chili's (If using)  for 2 to 3 minutes,


*Remove the leaves , allow to cool and grind it (grind black pepper corns-  if using along with the leaves) Grind till smooth with little cold water added to it.
Do not throw the water, use this same water for the soup.

* In a pan / sauce pan , heat Ghee/Butter or Vegetable oil , add cumin seeds to it , when it sizzles add crushed ginger , garlic and finely chopped onions. Saute till the onion turns brown, add Corn flour or All purpose flour and stir vigorously.

* Add then Asafoetida (If using) and water / Stock used to blanch the leaves, add salt (& lemon juice if using it instead of tomato)
Let boil till it reduces a bit, then add the nicely ground Leaves mixture to the soup and continue boiling till it reduces and becomes thick


* When it reaches the consistency you like, add cumin powder , stir and add heavy cream and switch off the heat.

* Drizzle few drops of heavy cream before you serve it.


Stay warm and enjoy Winter :)


Cheers
TN.

Tuesday, November 11, 2014

Jell-O Pinwheels


Got attracted towards these Jello Pinwheels - a very colorful dessert, while searching for some recipes in the net, Was keen to try it as its a super easy & real quick to make dessert.


NA was super excited to taste these freak looking bites :)


For making these You'll need 

Jello - any flavor or color you like - 1 Packet (85 gm Approx)

and some Mini Marshmallow's - about 3/4 cup 


Method 

* Line a flat medium sized Tray (Cookie Tray ) with an aluminium foil , grease with butter or use a Non stick cooking spray. 


* Stir 1/2 cup of hot water to the Jello contents, stir to dissolve the contents completely. 


* Add the Marshmallow's to it and microwave for a minute , take out and stir to combine till its dissolved and become frothy.  


(Check if its dissolved completely , if not heat in microwave for another 45 seconds to completely dissolve and combine) 

* Pour this mixture to the prepared (Greased) Pan and freeze for 40 to 50 Minutes.


* Slowly run a knife through the ends and , try lifting the sides first before trying to roll'em.


* Using a sharp knife or any thread (as shown in the video) cut in to 1 inch sized round pieces (Size  as desirable) 

* Serve or Refrigerate.


I had fun making these with NA. 
Am sure any kid who can read the instructions can make these too. 
Its a fun treat for kids. :)


Enjoy !

Cheers
TN

Here is the Youtube Link - making of Jello Pinwheels. 


Saturday, November 8, 2014

Double Chocolate Fudge Brownies


Sometimes I go crazy with lot many questions I ask myself, from very serious life changing question like - If I should continue my studies ?  to very silly one's like - what I should cook for the next meal ????
But then......


Chocolate is the Answer
Who cares what the question is.


Here's a recipe for a really sweet chocolate brownie's, 
for Chocolate lovers like me and many others.

Ingredients 

Butter - 1/2 cup 
Cocoa Powder - 1/2 cup (I used Hershey's , if using dark cocoa powder,use less)
Granulated white sugar - 3/4 cup (See Notes)
Salt - 1/4 tsp 
Vanilla extract - 1 tsp 
Instant Coffee Powder - 1/4 tsp 
Eggs (cold) - 2 no's 
All purpose flour - 1/2 cup 
Optional - Dry fruits - 1/4 cup lightly crushed (walnut/almonds , pecan's etc) I didn't use 

For the Topping - (Optional)

Condensed Milk - 1/2 cup 
Semi Sweet Chocolate chips - 1/4 cup  (May use chocolate syrup instead)


Method 

* Preheat the oven to 325 Degree F (163 Degree C) , Place an aluminium foil to line a medium sized baking tray (square shaped -if you have) , grease with butter or any non stick spray.Keep aside 

* In a microwave safe bowl - mix butter , sugar , cocoa powder , salt and coffee powder, Heat in micro wave for a minute to melt the butter(may take up to 90 seconds) , if not using a microwave, may use double boiling technique to melt and combine all these ingredients together.


(If double boiling the same , make sure the bottom of the bowl in which the butter and other ingredients are placed doesn't touch the boiling water underneath, butter should melt only with the heat of the steam)  

* once melted, stir to combine everything well , let cool for a minute or two and then add eggs and vanilla essence. Stir nicely using a spoon to combine.


* Then add the flour gradually while stirring the mixture.


*Pour this to the prepared baking dish and bake for 20 to 25 minutes. or until a tester comes out clean.


For the topping 

* Melt together condensed milk and the chocolate chips in the microwave. (May melt these by the double boiling too)  Stir nicely to combine and pour this mixture to the baked Brownies while it is still warm. 

* Refrigerate the brownie cake for 10 to 15 minutes to firm up a bit.


That's it....
Enjoy a Chocolaty Treat !


Notes :  I felt that the chocolate topping made these brownies super sweet, hence adjust sugar in the brownie mix if you like your brownies to taste less sweet.
             

Cheers
TN