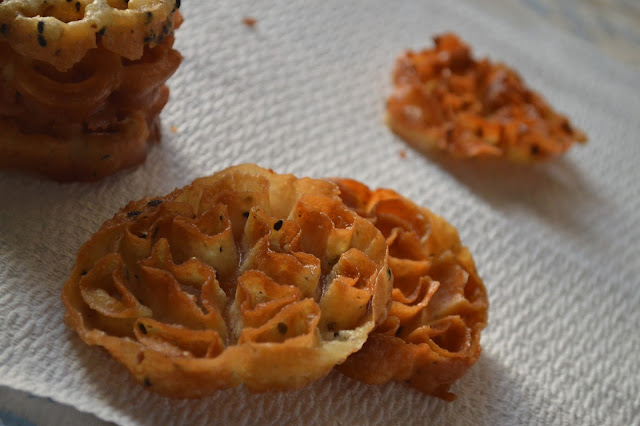
My pregnancy this time reminded me of many things that I loved to eat while I grew up. Fried Sardine-eggs , Jackfruit & many snacks made with the it & Indian Coffee House special "Masala Dosa"
I am grateful to all my dear friends who brought special food for me all these 8 months, I didn't miss my home much because of you guys & am so glad that I have you all :)
Since Achappom is my all time favorite snack decided to try making it , I haven't made it before.
Glad it came out really good for me, though It didn't come out well the first batch was wasted. Correct temperature of Oil and Achu/ mold is the key.
To make "Achappam" you'll need this special "Achu" specially designed mold, I brought it from Kerala, but it came out really well, these are available in Amazon, there's variations of these and Non stick varieties too which would be great especially if its your first try
Yes , again it tested my patience initially while frying'em, but was determined to make it alright until I mastered some tricks while making the same,
Temperature of the oil while frying, getting used to some "not so good" properties of Iron mold "Achu" , the consistency of batter etc are important, we learn with experience, may be I found it difficult because I haven't seen the way its made.
But I must write it tasted better than any Achappam that I had anytime in my life :)
Please note the lines given in "Bold" in the description given below, if planning to make these.
Ingredients
Rice flour - 2 cups
Maida / All purpose flour - 1 tbsp (Optional)
Thick Coconut Milk - 3/4 cup (Approx, adjust as per need)
(may use full fat Cow's milk too though its not used traditionally)
Egg - 1 small beaten
Sugar - 3/4 cup
Black Sesame seeds - 1 tbsp
Cumin seeds - 1 tsp
A pinch of Salt
Oil for frying
Method
* Mix all ingredients listed above for the batter, in a bowl , adjust the quantity of coconut milk to make batter thin in consistency, thinner than Dosa batter (or pan cake batter). Keep this for 20 to 30 minutes.
* Heat oil in a deep wok or saucepan, dip and keep the "Achu" Iron mold in the oil while its gets heated (at least for 5 minutes) until the oil and the "Achu" is really hot, bring down the heat to medium high.
* Transfer a small amount of the batter to another steel or aluminium bowl, so that each time you dip the hot "Achu"in to the batter, it doesn't make any changes to the whole batter, also its good to make these in batches especially if making these for the first time. You may make any changes to the next batch if its not coming out well with the first attempt.
* Check if the oil is really heated by frying few drops of batter in to the oil and it should bubble up fast. Once the oil is ready, take out the "Achu"/Iron Mold from the oil, shake off excess oil from the "Achu" and dip it to the prepared batter, immediately drop this "Achu" to the oil.
Do not dip the whole Achu/iron mold into the batter , then the batter wouldn't come out of it while frying.
* Once the Achu/iron mold is in the oil, wait for few seconds and then shake it lightly so that the Achappam comes out of it and gets fried, turn to the other side after few more seconds. Should be light brown in color on both sides.
If the Achappam doesn't get separated from the mold, use a fork to help separate it slowly,
* Ensure that the Mold/Achu is really hot every time you dip it to the batter or else the batter wouldn't get stick to it, also shake off excess oil from it before dipping the same in to the batter each time, its good to keep the Achu/Mold dipped in the heated oil after each Achappom is made, so that its temperature is maintained.Fry the rest of the Achappam's similarly.
* These Achappam's would be soft just after frying , place the fried Achappam's on to a tissue-paper and allow to cool and get crispy. Once cooled, transfer'em to an air tight container or Ziploc bag, it stays for a few weeks.
Enjoying Crispy Achappoms
:D
Notes : Please note the lines given in "Bold" in the description above if planning to make "Achappom"
Cheers
TN


